How To
Set up Function
Welcome to Function. A clean and modern theme that lends itself to many scenarios. It includes WooCommerce support, support for our Features and Testimonials plugins, and of course has a portfolio page, blog page, and much more! Let’s go over Function’s features shall we?
A note on using Woo Custom Typography: To keep the typographical rhythm and modular scale consistent Emporium’s entire layout is constructed based upon your based font size. In our demo that size is the equivalent of 15px. This means that if you choose to use our Custom Typography panel and change the body font size to 12px your layout will shrink to match the new copy size. If you’d like to override this behaviour you can set a max width for the wrapper in your custom.css file like so;
.wrapper {max-width: x;}
Where x is your preferred width for the main content area. This can be defined in pixels or ems.
Menus
There are three menu areas included in Function. To setup your menus go to Appearance > Menus. If you need help creating menus, please see our Menus video here.
Primary Menu – This is the menu that sits below your logo.
Top Menu – This is the smaller menu area at the very top of the theme.
Footer Menu – This menu resides in the bottom right of the footer.
Set up The Header
There are a few options you have for your header in Function. First of all is uploading your logo. We provide an easy way to upload your own logo to every one of our themes. You can also enable a search bar and have the cart shown in the header. Both of these appear to the right of your logo.

Custom Logo
To set a custom logo image go to:
Function > Theme Options > General Settings > Quick Start > Custom Logo
- Upload your logo image by clicking on the Upload button.
- Upload your logo file. Usually a .png or .jpg
- Select the Use this Image button.
- Then Save All Changes in your theme options.
Search Bar
To enable the search bar go to:
Function > Theme Options > Layout Options > Header
- Enable or disable to suit your preference.
- Choose what content to include in the search scope.
- Save All Changes in your theme options.
WooCommerce Cart
To enable the WooCommerce cart go to:
Function > Theme Options > WooCommerce > General
- Enable or disable the cart to suite your preference.
- Save All Changes in your theme options.
Set up The Slider
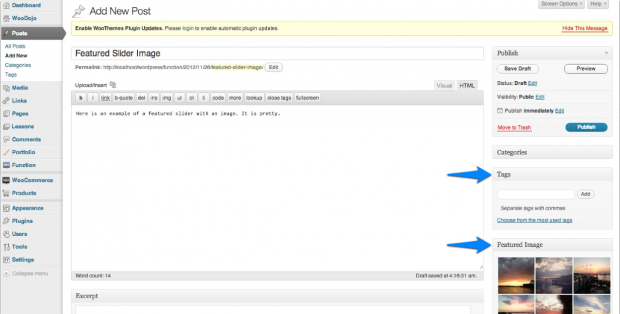
Function has a built in featured slider that uses post tags to drive content. To set post tags and adjust slider settings go to:
Function > Theme Options > Featured Slider > Slider Content
- Enable or disable the slider at the top.
- Choose the number of slides you want to show.
- Choose the slider tag you want to use.
- Save All Changes in your theme options.
To view additional featured slider settings go to:
Function > Theme Options > Featured Slider > Slider Settings
After you have reviewed your slider setting options you will need to create a new post for the slider. To do this go to:
Posts > Add New

- Be sure to use the ‘featured slider tag’ you set in your Theme Options > Featured Slider > Tag Option settings.
- Set a featured image by following the tutorial here.
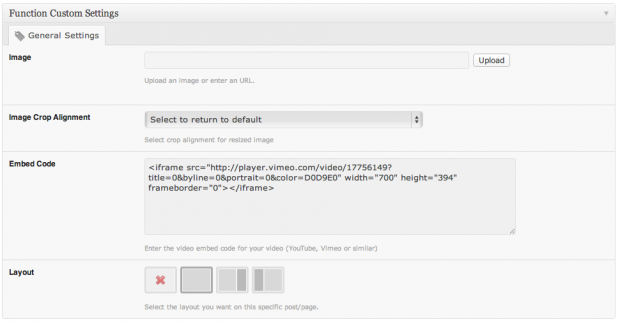
- To set a featured video paste your embed code in the Function Custom Settings Panel as shown below. If you do not see the Function Custom Settings Panel, please review your screen options in the top right corner of your Post > Edit page.

Set up The Homepage
In the homepage options you will find settings to control the introductory message, blog posts, promotion area and featured products, if you’re running WooCommerce. Function also supports the Features and Testimonial plugins.
To enable or disable what you want to show on the homepage go to:
Function > Theme Options > Homepage > Configure.
Introductory Message
You can write a short and sweet introductory message that will appear under the featured slider (if enabled). To set your introductory message go to:
Function > Theme Options > Homepage > Introductory Message

Blog Posts
To include your blog posts on the homepage go to:
Function > Theme Options > Homepage > Blog Posts
- Select the number of posts to display.
- Enter the title of your Blog Area section.
- Optionally select a category of posts to display if the content type is set to “Blog Posts”.
- Save All Changes in your theme options.
Promotion
This is an easy way to create a short promotional message and add a link to it on your homepage. You could use this for a giveaway on your blog or to show off your latest portfolio post or announce the newest products you’ve added to your store.

To enable the promotion message go to:
Function > Theme Options > Homepage > Promotion
- Write a title for the promotion.
- Write a little about the promotion.
- Label the button.
- Paste the URL that the button should link to.
- Save All Changes in your theme options.
Featured Products
Lastly, under these options you can enable featured products on your homepage. It may help your customers find some of your favorite products faster. To enable go to:
Function > Theme Options > Homepage > Featured Products
- Choose the number of products you want to show.
- Title the featured product section for your homepage.
- Save All Changes in your theme options.
Set up The Portfolio
Functions includes our standard portfolio options, allowing you to easily add and show off your work. This can be anything from photography, videography, design work, etc⦠There are a few settings we need to go over first though before adding any portfolio posts.
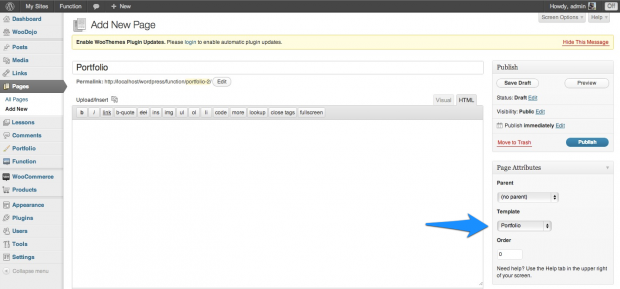
First, create a new page and select the ‘portfolio’ page template.

- Go to Pages and choose Add New.
- Title your portfolio page as you’d like.
- Under Page Attributes select the Portfolio page template.
- Publish your page.
If you want to use Portfolio Galleries go to: Portfolio > Portfolio Galleries Here you can add galleries, which are essentially categories for your portfolio posts.
To setup options for your portfolio go to:
Function > Theme Options > Portfolio
- Set your portfolio items base URL, then go to > Permalinks and Save
- Optionally choose a gallery to be featured in your portfolio template.
- Exclude galleries with gallery category slugs.
- Exclude the portfolio posts from the site search.
- Choose to link portfolio items to the post or the lightbox.
- Enable or disable pagination on the portfolio page.
- Save All Changes in your theme options.
Set up The Features
[insert name=”docs-features-plugin”]
Set up The Testimonials
[insert name=”docs-testimonials-plugin”]
Widgets
Custom Function Widgets
The theme includes 7 custom widgets that you can add to any of your widgetized regions. Function also includes styling for many of our WooDojo widgets.
The custom Woo widgets included are:
- Woo – Adspace
- Woo – Search
- Woo – Flickr
- Woo – Blog Author Info
- Woo – Embed/Video
- Woo – Subscribe/Connect
- Woo – Component
[insert name=”adding-widgets”]
Page Templates
[insert name=”page-templates”]
